TL;DR: OpenAI has a new code generating model that’s improved in a number of ways and can handle nearly two times as much text (4,000 tokens.) I built several small games and applications without touching a single line of code. There are limitations, and coding purely by simple text instructions can stretch your imagination, but it’s a huge leap forward and a fun experiment. All the demos can be played with here: https://codepen.io/collection/qOqJqk
I’ve been building games and applications entirely through natural language instructions with OpenAI’s new code-davinci model for several weeks and it’s been a fascinating experience. I’ve been able to build apps and games simply by telling the model what I want. More info here on its other capabilities.
Every single example was created by providing only simple instructions to the model (“create a button that…”). I didn’t change a single line of code, stitch together functions or edit anything. All of the code in these applications was generated entirely by the model. If you have access to the model you can try the instruction prompts yourself (you can get access at openai.com).
Some of these examples took a while to figure out because I wanted to stick to the rule of only using the complete output from the model. I also had to figure out best practices for giving the model instructions. Some instructions it got right away, other instructions were more daunting. I’ll explain what I have learned so far at the end of this post.
Background
When OpenAI first launched Codex Greg Brockman did a live demonstration where he created a JavaScript space shooter game through natural language instruction. This showed off how capable Codex was and also gave us a glimpse into the future of coding with an AI assistant.
Ever since the launch of Codex I’ve wanted to see how far natural language-to-code could be pushed. I created some internal examples at OpenAI and demos used to show off the technology, but I was really curious to try building more complex applications. The new code-davinci model created a great opportunity for this.
The following examples were chosen to try different concepts and see how hard it would be to get the model to create them. Some were easy, some not so much. In making them I made some observations about how the model understands language and code.
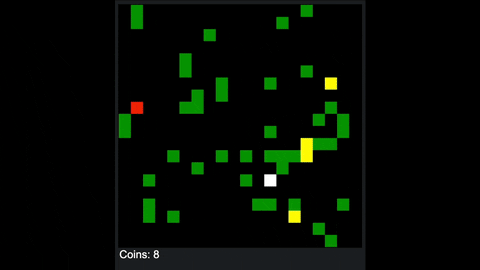
1. Minimal Legend of Zelda
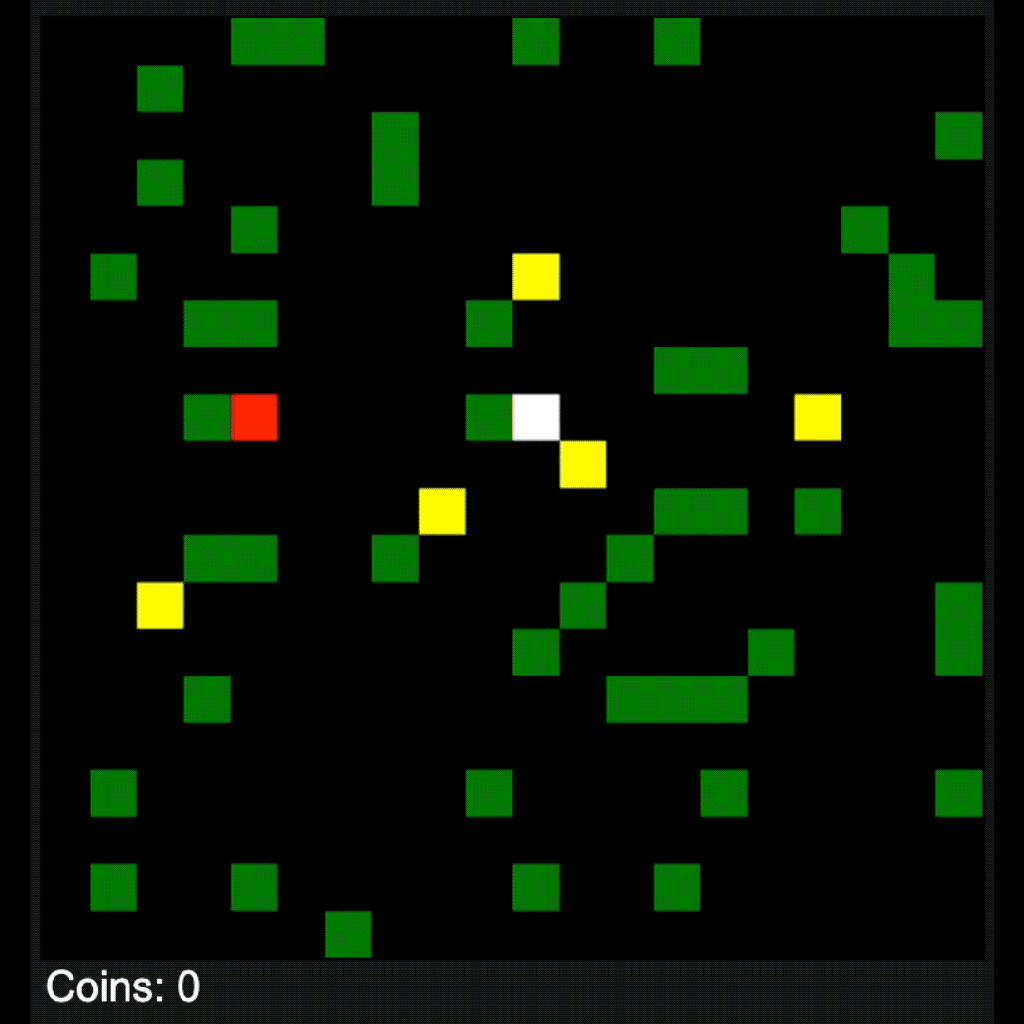
We saw how Codex could create interactive elements like those in the space shooter game demo, but could this be scaled up with the new model into a game with multiple elements and levels?
For my first experiment I decided to make a game where the player controlled a character that could roam around a scene, collect gold and avoid a monster. For added fun I wanted to make it so the player could roam forever with an endless number of generated scenes.
I was inspired to try this because I’d observed that the new model had a really good grasp of arrays of specific lengths and arrays of arrays – which are a fundamental building block of many 2D games. An array of arrays can describe a scene map. In some experiments with the model I saw that it could reliably move an element up, down, left or right from one array to another. This means that the model can understand to a limited extent 2-dimensional environments like those found in many games.
Although this game just uses colored blocks, I could easily have replaced the visual elements with game sprites, but as an additional condition to this challenge, I decided to only use html and JavaScript with no external assets or libraries.
These are the instructions I gave to the model:
/*

1. Tile map generator
0 = Empty space
T = Tree
G = Gold coin

Create a function that generates an array describing a 20x20 scene with scattered trees and 5 gold coins.

2. Add canvas
Add a 400x400 canvas with a black background to the document.

3. Score
Add a text display for the coins collected (white arial 18px) in the lower left corner of the scene.

4. Add map
Add a map to the canvas.

5. Add the player
Add a 20x20 white square controlled by the keyboard direction keys. Stop the square from moving if it tries to move through a tree.

6. Create a new map if the player moves to the other side.
Generate a new scene if the player moves off screen top, bottom, left, right.

7. Add monster
Add a red monster that moves each time the player moves. It tries to get to the player. If it touches the player it takes away a point.

*/
You can try it out here and see the code.
I’m not a game developer so some of my instructions are clumsy and imprecise compared to what the model actually is capable of understanding. That said, it had no trouble understanding what I wanted with a tile map or how to apply it to a canvas element.
With the right instruction the model was able to prevent the player from moving through trees – which was the first big test to see how well it grasped game logic.
Adding the monster (the red square) was pretty easy. When I told the model to add a monster that “hunted the player” it created a function that sent the monster straight at the player like a guided missile. I had to play around a bit with the prompt to get a behavior that was challenging, but not too challenging.
2. Five-Letter Word Game
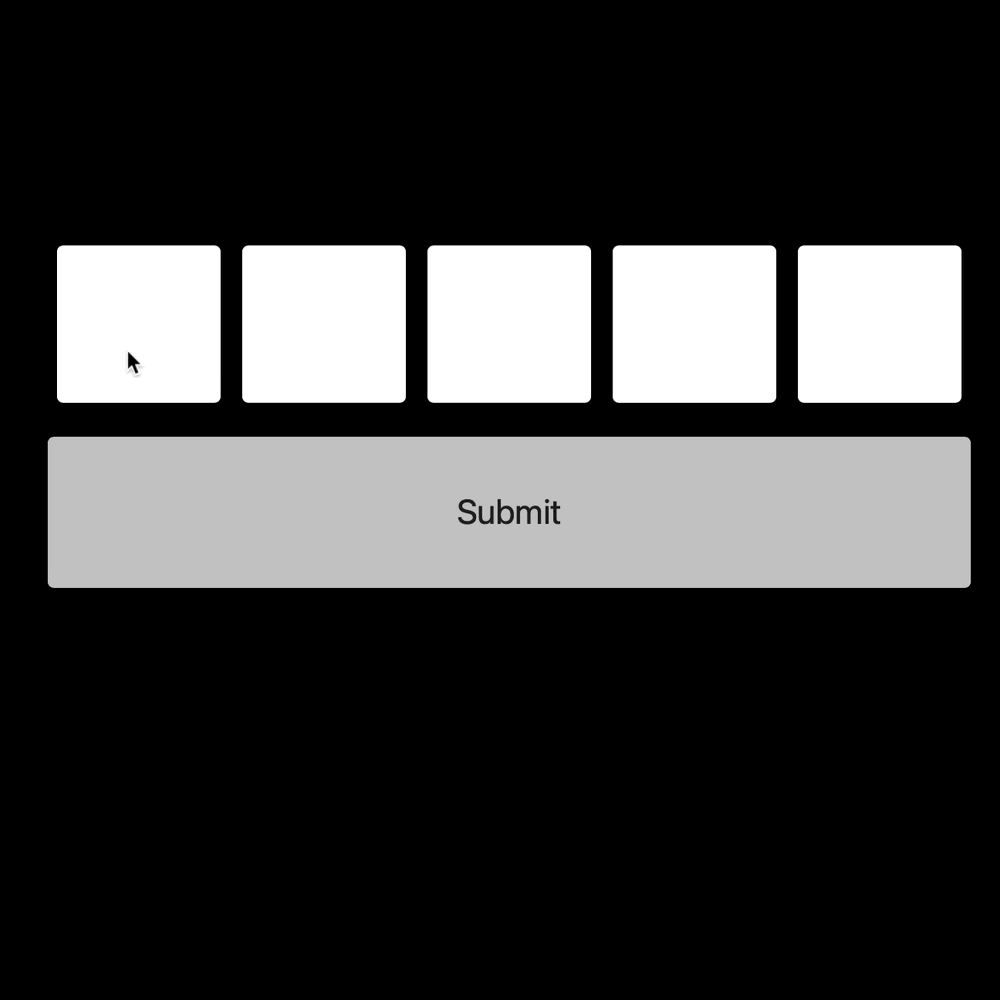
For my next experiment I wanted to try making something that required logic that was different from a standard video game. I decided to see if I could make a simple version of a popular word game you may have heard about. The rules are basically the same, but I have one input box instead of six.
To generate the word list, I had the OpenAI Davinci model create five-letter words. I then added them to the instructions.
These are the instructions I used:
/*

1. Secret word
Create a function to generate a secret word from this list  ['APPLE', 'BIBLE', 'DRINK', 'EARTH', 'FABLE', 'GHOST', 'HONEY', 'JUICE', 'LIGHT', 'MONEY', 'NURSE', 'OASIS', 'PAPER', 'QUEEN', 'RIVER', 'TRAIN']. Select a secret word. Print it to the console.

2. Letter inputs
Create 5 text input boxes that accept only one letter. Make the letter centered in the box. Make the boxes 19% of the width of the div wide and 100px tall. Give each input an ID. Add them to the document. Align the row in the center.

3. Make the letters uppercase when they're added
Uppercase each letter after it's added and change the background to white.

4. Submit button
Create a submit button and add it to the document under the letter inputs. Make the button as wide as all of the boxes. Make the text 22px. Add it to the document. Center everything.

5. Check letters
Check each user input if the letter:
Case 1: If the letter is in the secret word change the input background of that letter to yellow.
Case 2: If the letter is in the word *and* in the same position as the letter in the secret word make the input background of that letter green.
Case 3: If the letter isn't in the secret word, make the background white.
Case 4: If the user letters match the secret word letters print "You win!" below the button (white text arial) and make all the backgrounds green.

*/
This is the final game. You can also see the generated code when you open it on Codepen.
3. Matrix Rain
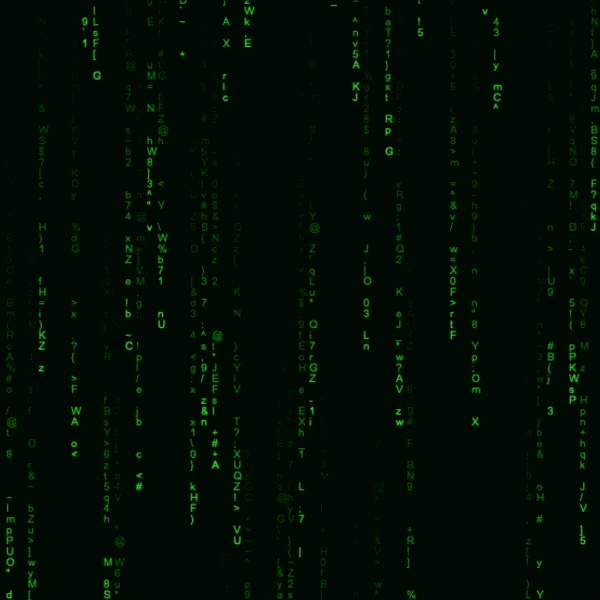
I was curious if the model could create an effect like the raining text from The Matrix. It turns out that this is probably a pretty common demo and the model was able to generate the right code with my first attempt.
/*

Matrix rain

1. Create canvas
Create a canvas and at it to the document

2. Rain
Create a Matrix rain effect with letters.

*/
Here’s the demo and code:
4. Tic-Tac-Toe
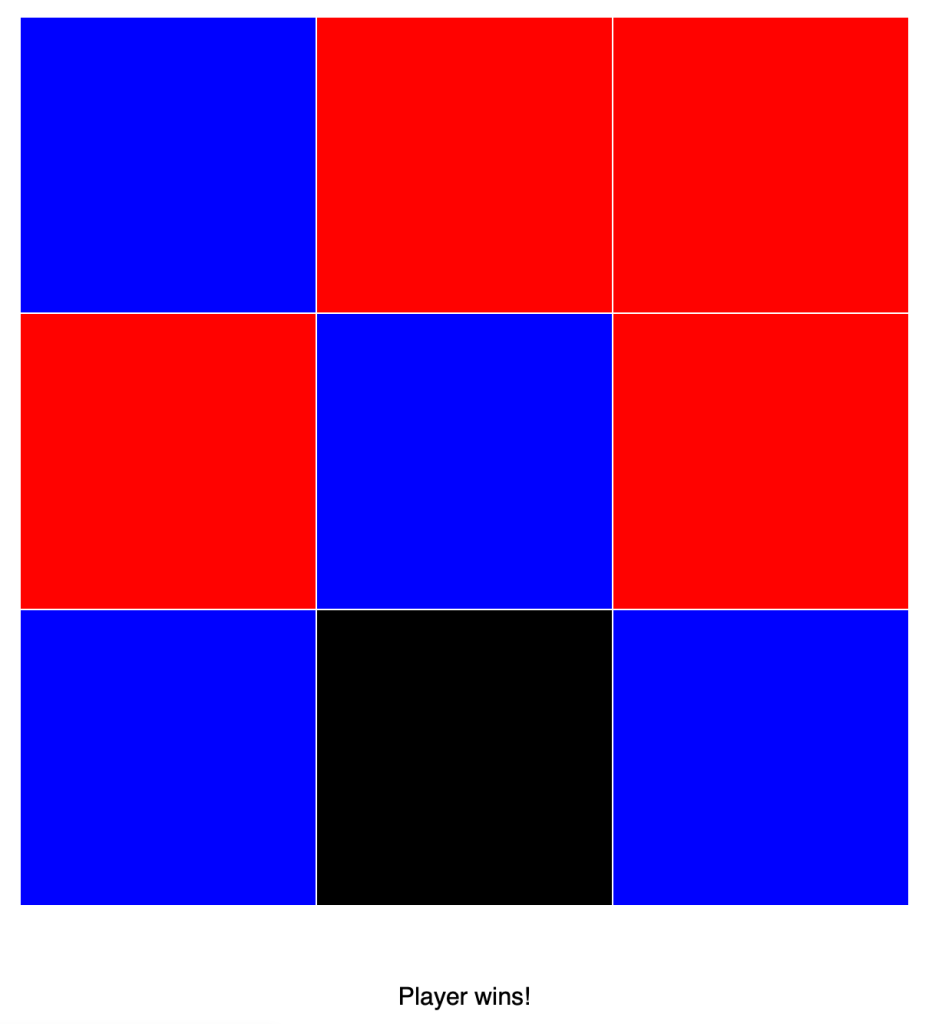
In this demo I had the model create a Tic-Tac-Toe game (using red and blue squares.) It’s not the smartest opponent but it’s able to play the game. This could be taken further by providing strategies in the form of functions or giving it a method to “learn.”
/*

1. Make the document body background white
Make the document body background white

2. 3x3 table
Create a 3x3 table with 190x190px cells and add it to the document. Make the cells black with white cell borders.

3. Message box
Add a #messageBox for game messages below the 3x3 table. Helvetica font. Display the text "Choose a box".

4. Computer move function.
The computer plays red after the player makes a move. The goal is to get three of the same colored boxes in a row.

5. Check for winner
After each move check if the computer or the player has 3 boxes in a row. If the player or the computer has 3 boxes in a row, display the winner in #messageBox.

6. Add listeners
Add listeners to the table cells. If the user clicks on a black cell turn the color blue.

7. New game button
Add a button and function to start a new game.

*/
Demo and code:
5. Vampire Hunter
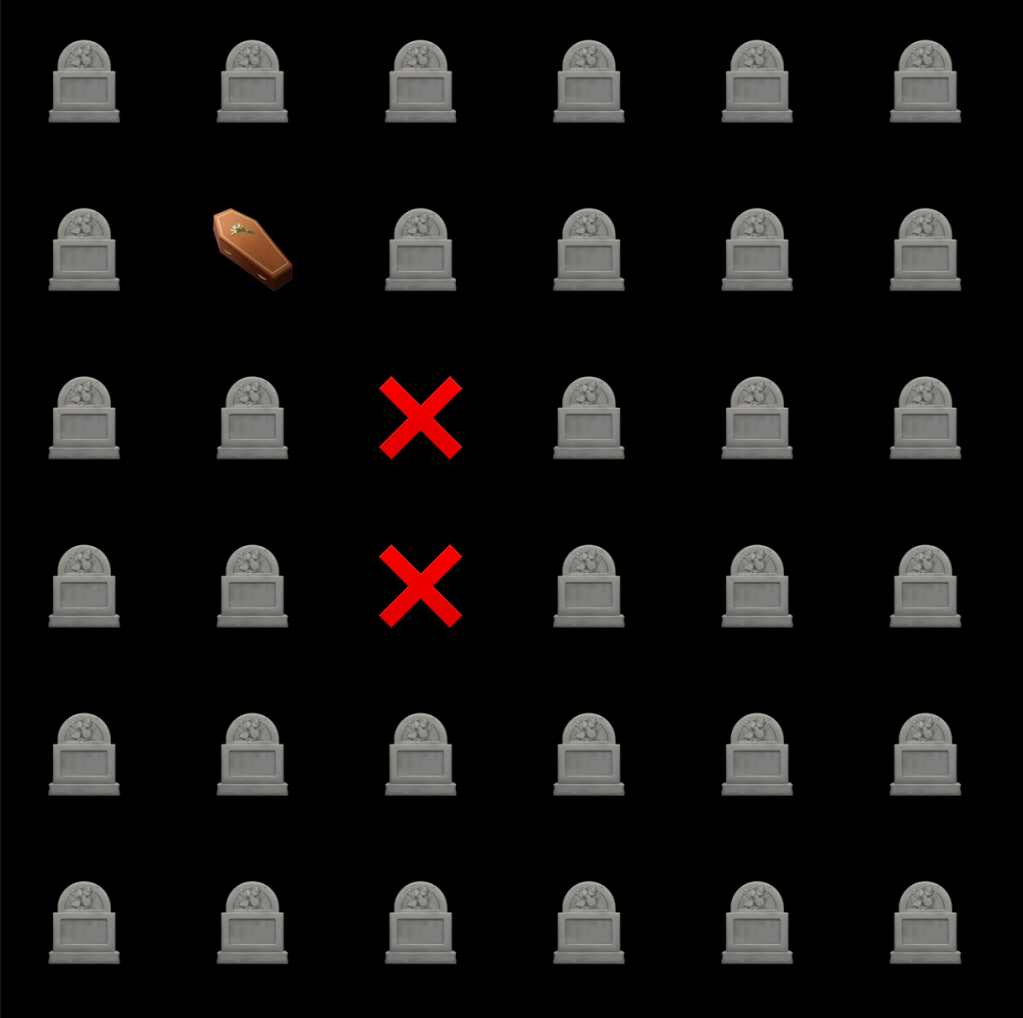
For this experiment I set out to make a game where you’d dig up grave sites and try to find coffins before Dracula finds you. It took a while to figure out if the UI or the logic should take precedent. Eventually I settled on an approach where I created the logic and UI elements in the order they would be needed.
/*

Vampire Hunter

1. Graveyard array
Create a function to generate an array of 26 "❌"s, 2 "🧛"s, 5 "⚰️"s and 3 "✝️"s. Shuffle the Graveyard array and print it to the console.

2. Game function
Rules: If the player finds 4 coffins they win. If they find more vampires than crosses, they lose.

3. Create scoreboard
Create a scoreboard that shows the game messages "Dig a grave..." and shows the number of items found by the player "Coffins:-, Crosses:-".
Add it to the document. Style: 100px height, white Helvetica.

4. Graveyard tile map generator
Create a function that generates an 6x6 graveyard tile map of tombstones "🪦"s (button background color black). Each tile has an event listener that reveals an item from Graveyard array and updates he scoreboard.

5. New game button
Create a button to start a new game.

*/
Demo and code:
6. VR Maze builder
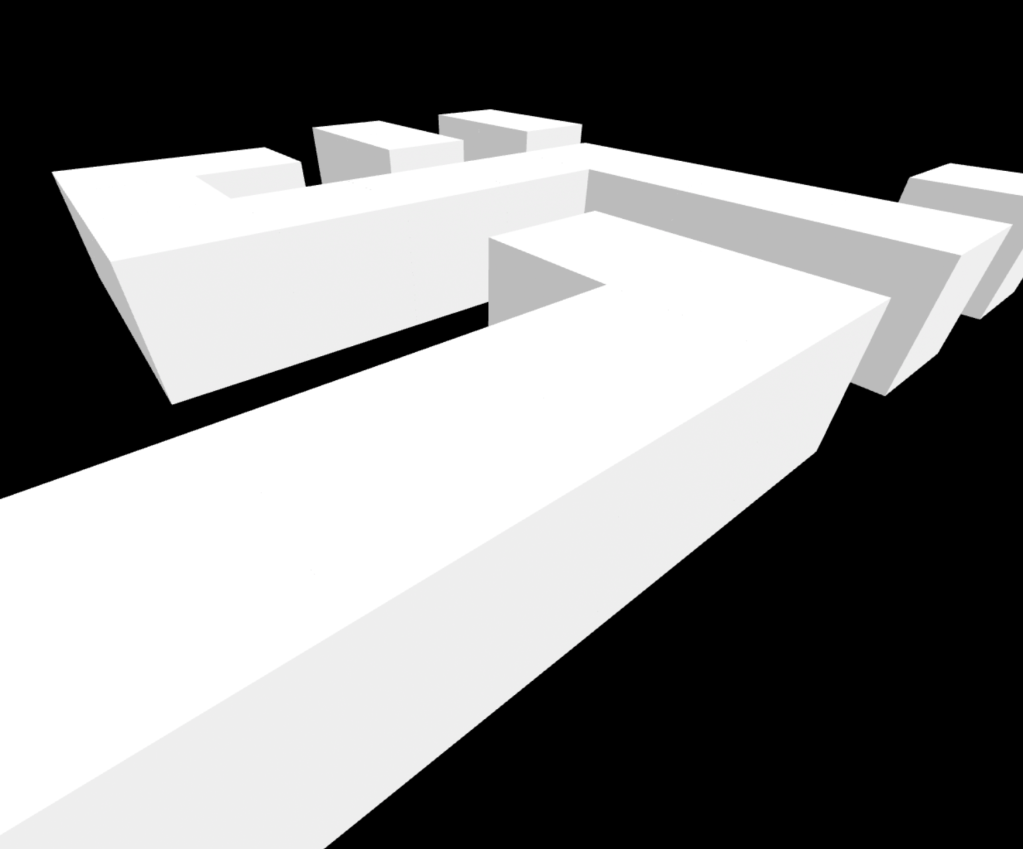
The model’s ability to use arrays to create 2D game maps made me curious to see what would happen if I asked it to create a 3D environment using A-Frame (a library that works with Three.js.) I was amazed to see that it grasped what I wanted right away and generated exactly what I was asking for.
For this example I included web page boilerplate and the import code for A-Frame in the prompt:
    <!DOCTYPE html>
<html lang="en">

  <head>
    <meta charset="UTF-8">
    <meta name="viewport" content="width=device-width, initial-scale=1.0">
    <meta http-equiv="X-UA-Compatible" content="ie=edge">
    <title>Document</title>
    https://aframe.io/releases/1.3.0/aframe.min.js
  </head>

  <body>
    <a-scene>
    </a-scene>
  </body>
  <script>
/*
1. Make the sky black
2. Create a  floor with corridors using this map: 1 = wall, 0 = space
Floor = [
        [0, 0, 0, 0, 0, 0, 0, 0],
        [1, 1, 1, 1, 0, 1, 0, 1],
        [0, 0, 0, 1, 0, 1, 0, 0],
        [0, 0, 0, 0, 0, 1, 0, 0],
        [0, 1, 1, 1, 1, 1, 0, 0],
        [0, 1, 0, 0, 0, 0, 0, 0],
        [0, 1, 1, 0, 1, 0, 1, 0],
        [0, 0, 0, 0, 1, 0, 1, 0]
]
*/
Demo and code (use the arrows to point the camera down to see the maze):
7. Image manipulation tool
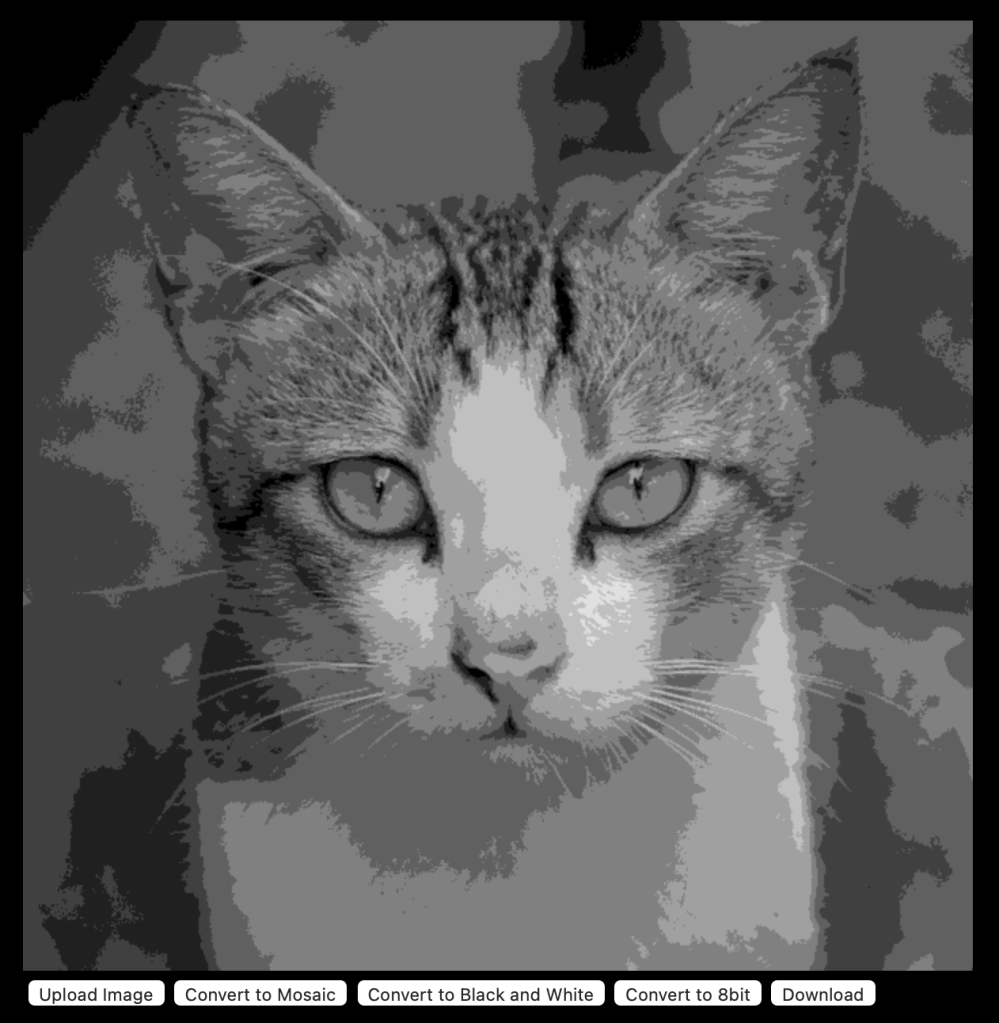
Moving away from games, I decided to try making a tool that would edit an image in the browser window. This was very straightforward and the model didn’t have any difficulty creating the functions. Allowing me to download the new image was as simple as asking it to create a download button.
1. Add Canvas
Create and add a 600x600 canvas to the document.

2. Create an upload button
Create a button for a user to upload an image.

3. Add the button
Add the button to the document.

4. File select
When the user clicks on the button let them select a file. Display the image in the canvas.

5. Convert image to mosaic button
Create a button to convert the image to a 32x32 mosaic.

6. Convert image to black and white
Create a button to convert the image to dithered black and white.

7. Convert image to 8bit video game style
Create a button to convert the image to an 8bit video game style.

8. Download button
Create a button to download the image.
Demo and code:
8. Painting app
This was another quick demo the model was able to generate once I clearly separated the different functions in the instructions.
1. Create paint canvas
Create a 600x400 canvas with a black background to paint on.

2. Add paint canvas to document
Add the paint canvas to the document.

3. Create paint box
Create a row of 16 colors in 12x12 boxes.

4. Add paint box
Add the paint box to the document under the canvas.

5. Select paint
Let a user select a color from the paint box. Display it in a circle.

6. Allow paint
Allow the user to select paints and paint 10x10 blocks on the canvas when they click and drag their mouse.

7. Clear button
Create a button under the canvas to clear the canvas.

8. Download button
Create a button to download the image.
Demo and code:
Lessons learned
I found the new code model great at creating mini-applications and understanding how to take instructions and turn them into functions. The more things I tried, the more I learned about how to give this model instructions.
More complex applications are still challenging. I have a card game that works okay on a logic level, but getting the drag and drop elements and everything else to consistently work has been inconsistent. I’m clearly overreaching, but it’s fun to see how far the model can be pushed.
Here are a few of the things I learned. Take these as suggestions and not instructions carved in stone. There are probably better, more efficient ways to provide instructions to the model, but these are a good starting point.
Logic first
Generally speaking, I’ve found that creating my logic elements first then my UI elements was the best approach. It’s easier to get a UI element to refer to a function that’s already in the code.
Number your instructions
If you give each instruction a number it makes it easier to see when the model is adding new instructions and to debug the code.
Create functions to make things
If you ask the model to “generate a 100 item array” it might try to return a large array which can get the model stuck repeating itself or consume a large number of tokens. However, if you tell the model to create a function to generate the array, it’ll do it in a more efficient manner with a simple for loop. When coding with the model it’s important to keep track of things you want the model to do and things you want the model to create code to do.
Retry your prompt
Sometimes there’s a bit of variability in how the model will interpret your instructions. If you set the temperature to around .5 and try it a few times you might get a better hit. When it produces a result I want, I like to see how it interpreted my instructions so I can be more explicit in the future.
Next steps
If you have access to the OpenAI API and Playground play around with the instructions and try your own. I’m sure there are a million better ways to do all of these examples and there are an infinite number of better applications and games to be made.
While the model is best used as a programming partner, it’s fun to see when you only provide the instructions and the model does all the coding.
If you create something cool let me know on Twitter @AndrewMayne
Update: I’ve added some answers to questions people have asked me.
How long did it take to create these prompts?
Some only took a few minutes (the Matrix rain, the maze generator.) Others took me a few hours (I was learning how to do this as I experimented) and it would have been faster just to have coded the solution – but that would be missing the point. I wanted to see how much you could accomplish only through natural language. After having created a lot of code prompts I’m a bit more efficient at it now.
What is the process for creating these?
I made a simple application that would send my text to the OpenAI API and return the generation and inject it into an iframe. If a prompt worked I’d save it and the output to a text file so I could inspect it later. In some cases I tried dozens of different approaches and accumulated many, many .txt files.
Will this replace programming?
The current model can make programming a lot easier – but we’re not quite at the point where we need to throw out our programming books. If you look at these prompts you’ll see I’m often using programming conventions and talking about arrays and divs, etc. But if you stand back and look at the progress being made in AI code generation it’s obvious things are moving very quickly. However, I think you’re always going to want humans who understand code somewhere in the loop for quality control and making sure the output is aligned with our goals.
